
In this post, we’ll see how to do UI test automation in node application using TypeScript, Mocha and Selenium. This post is extension of my previous post, where I’ve covered Setting up node application with TypeScript in VS Code — using mocha, chai, mochawesome, gulp, travis If you are looking for setting up node project with TypeScript and Mocha, first refer previous post and then continue below for browser based tests with selenium.
Note: The entire VS Code project used in this post is available at GitHub.
Let’s get started!
1. Add selenium-webdriver and chromedriver capabilities in project
- First add selenium-webdriver dependency to package.json
npm install selenium-webdriver --save-dev- Download Chromedriver and put that in PATH.
2. Add Mocha Test
- before – initializes chrome driver
before(function () {

    // initializing chrome driver
    driver = new webdriver.Builder()
    .withCapabilities(webdriver.Capabilities.chrome())
    .build();

    // maximizing chrome browser
    driver.manage().window().maximize();
});- afterEach – takes screenshot if test case fails, collects logs etc
afterEach(function () {

    let testCaseName: string = this.currentTest.title;
    let testCaseStatus: string = this.currentTest.state;

    if (testCaseStatus === 'failed') {
        console.log(`Test: ${testCaseName}, Status: Failed!`);

        // capturing screenshot if test fails
        driver.takeScreenshot().then((data) => {
            let screenshotPath = `TestResults/Screenshots/${testCaseName}.png`;
            console.log(`Saving Screenshot as: ${screenshotPath}`);
            fs.writeFileSync(screenshotPath, data, 'base64');
        });
    } else if (testCaseStatus === 'passed') {
        console.log(`Test: ${testCaseName}, Status: Passed!`);
    } else {
        console.log(`Test: ${testCaseName}, Status: Unknown!`);
    }
});- after – closes browser
after(function () {
    driver.quit();
});- it – performs test operation and validates result. e.g. open bing.com and search for a text
it('should search for nilay shah at bing.com', function () {
    let Url: string = `http://www.bing.com`;
    return driver.get(Url).then(function () {
    console.log(`Page "${Url}" opened`);
    }).then(() => {
        return driver.getCurrentUrl().then((currentUrl) => {
            currentUrl.should.include(
            `www.bing.com`,
            `Expected url: www.bing.com, Actual url: ${currentUrl}`);
        }).then(() => {
            let searchBox = driver.findElement(webdriver.By.name('q'));
            searchBox.sendKeys('nilay shah');
            return searchBox.getAttribute('value').then((value) => {
                value.should.equal('nilay shah');
            });
        });
    });
});- Here is full SeleniumDemo.test.ts


3. Run Tests
- Run tests with mocha (below command from project root folder) or just hit F5 from VS Code (Assuming already followed steps from previous post)
mocha .\lib\test\SeleniumDemo.test.js- Note that, I’ve kept chromedriver in project root folder, and I’ve added PATH as . (current directory) so test will be able to find chromedriver from the PATH.
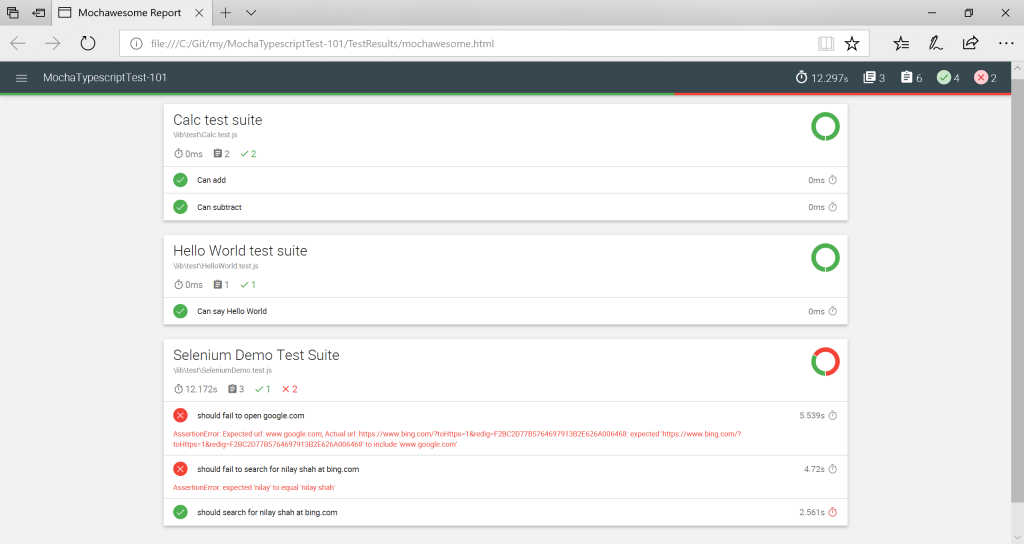
- Test will launch single chrome browser instance, perform all tests in sequence and then close browser.
- Mochawesome Report will look like below when you run all tests (unit tests and ui tests together)
4. Summary
- This post covers basic steps for setting up UI test automation using Node.js, TypeScript and Mocha.
- If you will go through the code at github.com, you will notice that I’ve skipped this test with describe.skip() — this is because repo is configured with Travis CI which builds and runs all tests. And to get UI tests running in CI requires headless chromedriver.
Please share your thoughts using comments on this post. Also let me know if there are particular things that you would enjoy reading further. Please feel free to connect me @nilaydshah.